
Installation and Upgrading DF™ TopList Pro/Lite
Installation of toplist.
For installing You should have the distribution kit of toplist (install.cgi) and FTP access. Domain name wich will be used for installation should be web accessable.
It is needed to identify the operating system (OS) of a server the toplist will be installed on. The distribution kit should match the OS on server. If the distribution kit You have doesn't match the OS please address to DF for the needed distribution kit. At the moment we compile toplists for: Linux, FreeBSD, Solaris (CPU x86) and WindowsNT.
You may find out the OS from server administraor or identify the OS independently using "Perl Informer" testing script.
For identifying the OS independently You should:
- download Perl Informer from dfservice.com site (DF Perl Informer)
- upload in text mode perlinfo.cgi in folder "cgi-bin" on the site the toplist will be installed on, assign permissoin 755 (rwx r-x r-x).
- access http://site.com/cgi-bin/perlinfo.cgi trough the web
- The OS should be visible in the row Operation System: [ linux / freebsd / solaris / MSWin32 ]
Upload the distribution kit (install.cgi), that is matching the OS of server, on server in binary mode and assign its permition to 755. Its recommedned to upload install.cgi in the directory the toplist will be installed in.
Launch install.cgi (http://сайт.com/cgi-bin/install.cgi) — image below.
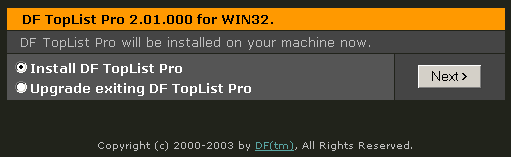
Choose Install DF TopList and press "Next" button
If launching failed — there can be following reasons:
- wrong install.cgi file permission. Check it, the permission should be 755 (rwx r-x r-x).
- the distribution kit is compiled not for Your server's OS.
- the distribution kit is uploaded not in binary mode. Reupload the distribution kit in binary mode.
- install.cgi is uploaded in folder where cgi-aplications launching is forbidden. Make sure that other cgi-aplications can be launched in this folder. If other scripts can't be launched — try create .htaccess file (if this file exists then just add following line to it) with "AddHandler cgi-script .cgi" line (without quotes). If it doesnt help address to administrator.
The second page:
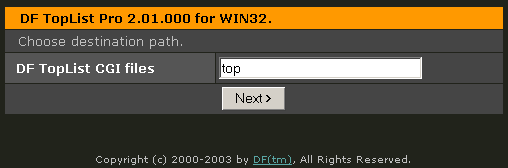
You need to appoint a path to folder for installation. If You want to install toplist to the directory where install.cgi is, then just type a dot ('.' — current directory, ".." — previous directory). Chosen folder must exist and have rights allowing script to record to this folder.
After appointing the path press "Next".
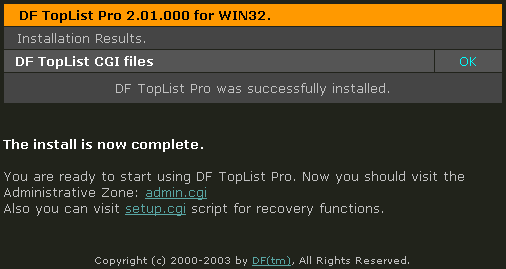
If You see this window then the first stage of installation is done successful. Click the link "admin.cgi" for toplist administration.
1.6. Messages of errors and ways to fix them:

If You see this page then change permission of folder toplist was installed in, and refresh page (with the same data) in browser. If permission of folder toplist was installed in is 755 then change permission to 777 (only in case of this error occures). After page refreshing You should see the window shown in point 1.5.
If You see this page, perhaps the distribution kit is damaged or not fully uploaded or uploaded in text mode or has incorrect permissoin. Check out permisson of install.cgi file. Make sure that the distribution kit is upladed right: compare file sizes on your computer and on ftp. They should math each other. Reupload the distribution kit in binary mode. While uploading files in text mode they often have less size on ftp because of encoding change.
During the first launching of toplist You will be asked for a new login and password. Enter login and password You want assign for toplist administration area access. Login will be only used in case of network password usage (.htaccess).
After password saved You will see big ammount of settings and the phrase "Filled automatically, need to save". During the first toplist launching all settings are as default. Toplist finds primary pathes and defines server's settings. It is needed to verify are they are valid or not and save them. Special attention is required for settings marked with yellow color.
It is needed to verify fallowing settings:
- HTML Directory: the path on hard drive used for html files creation. The path should match the address through web appointed in HTML URL.
- Your Email Address: enter Your email adress.
- Time Zone: choose the time zone and try not to change it in the future. While moving to another server the time zone wount be changed. For russians by defaults we set up MSK ((GMT+03:00) Moscow, St. Petersburg, Volgograd), for others PST ((GMT-08:00) Pacific Time (US & Canada); Tijuana).
- Apply daylight savings time conversion?: summer/winter time changes.
- Path to sendmail or SMTP Server: verify if Your servers path to sendmail is different from standard.
It is also recommended to review attentively all the settings and assign some parameters manualy if You see it is needed or leave them by defaults without changes. You can always change settings in the future. Save settings by clickng the "Apply This Settings" button.
If You use DF TopList Lite version all the settings You can not change are marked as dark.
If an error occures after You saved the settings then verify the path of "HTML Directory" and its permissions (if You are not sure in permission correctness assign it to 777). Error message contains all the information how to fix this error.
Press Rerank then click the link INDEX at the top of a page. If everything is OK You should see a table of rating.
Setup is finished, congratulations!
Upgrading of DF TopList.
It is recommended to upgrade toplist (Upgrade exiting DF TopList) in case if You want to save a copy of member's area design files only. If design files doesnt different from standard we recommend a new installation even if toplist is installed in THIS folder
Not all versions are compatible for upgrading. Versions with the whole and tenth parts are compatible (for example, 2.00-2.09 are compatible) and upgarading can be done without converter. If versions are not compatible by its numbers upgrading is possible with the help of converter.
While upgrading toplist please read instructions. Even if upgrading is possible without converter it may have unique features depending on toplist version. This features can be found in documentation.
Before upgrading it is recommended to backup all databases: in backup section mark all fields, do backup and make sure that the backup file that was created doesnt have zero size (it may happen in case of lack of free space on hard drive). Or You may just make a copy of the folder manualy.
Launch install.cgi (http://site.com/cgi-bin/install.cgi) of new version (image of point 1.3 "Launching the installation program").
Choose Upgrade exiting DF TopList and press Next.
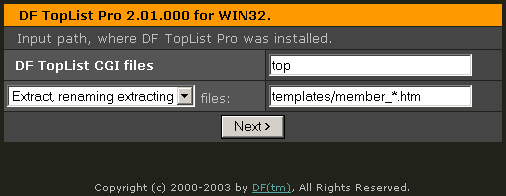
Enter the path to installed toplist.
Choose type of unpacking and a mask for those files you want to manipulate at updating with.
- Extract, renaming existing — if such file already exists — it will be renamed
- Extract, renaming extracting — if the file exists — it remains, and the new file is renamed. Extract, replacing existing — old files will be replaced new, copies does not remain.
Apply this only if you are sure that old and new files are completely compatible among themselves.
- Do not extract — new files are not unpacked. If old and new files not are compatible it can to lead to to failures in toplist work
Possible mistakes are similar considered in the installation instruction.
If at updating it is necessary to make any additional actions (converter execution, etc.), they will be described in the changes list for corresponding version.
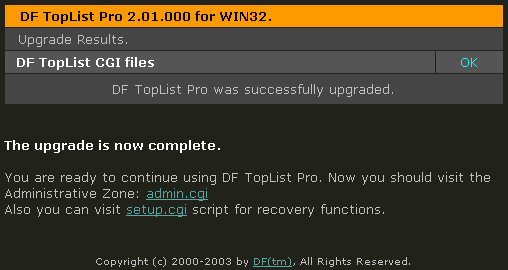
Click on the link "admin.cgi" and check up toplist options. It is desirable to save them again.
Converter usage.
Look through the changes list. Download all converters for versions following after installed up to updated, upload them on the server in the directory with executable files of the product, set up permissions for execution (in Unix systems: 755). Upload the distribution kit of the new version and set up permissions for execution.
Remove all executable files of the previous version of the program to avoid changes in files of databases (or move the executable files in other catalogue or remove permissions for their execution).
Execute process of updating up to item 1.4 — do not execute installed files.
If there are some converters from the installed version up to the updated version — is necessary to execute them in order from the lower version to the last one. Execute the converter through the web (as the distribution kit) or in the system console. Wait for "Convert complete" message, be sure, that converting has passed without errors. Execute the following converter.
If there were problems — eliminate their reasons and rerun the converter. If is not possible to solve problem — contact with administrator or software support service. You shouldn't run the following converter if the previous converting has not passed successfully.
Follow to item 1.4 of product updating.
After updating the previous version, it can be necessary to repair search database. For this purpose: go to SETUP (setup.cgi), in the window "Diagnostics and Recovery" check the "Search database" tick and push "Start Diagnostics" button. If in the opened page "Diagnostics Result" there is an item "Search database not full", check a tick opposite to him and press "Recovery". If this item is absent on the page, restoration of search database is not required.
In some versions it is necessary to make restoration of missed or damaged files and directories (setup.cgi: Repair File Structure-> Create missed files and directories). Press "Repair" button, toplist will create missing files and directories necessary for the new version.